やりたいこと
Markdownエディタを実装していくと、カーソルのいる場所がリストなのか太字なのか見出しなのかを知りたくなります。単純に記法によって見た目を変えたいのであれば、NSAttributedString.init(markdown:options:baseURL:) を使えばよいです。
一方で、エディタに太字ボタントグルボタン機能(はてなブログにもありますね)を作っていくと、「いまカーソルがいる場所は太字なのか」が知りたくなります。それが分かると
- カーソル箇所が太字の場合:太字記法(
****)を削除する - カーソル箇所が太字ではない場合:太字記法(
****)を挿入する
といった処理を実装することが可能になります。
課題
太字かどうか確認する場合、簡素に考えると
- カーソルがある行を取り出す
- カーソル前後に文字列を2つに分割する
- 分割した2つの文字列それぞれに
**があれば太字とする
という実装方法が思いつきます。これでもある程度は動くのですが、このように太字に指定される範囲が複数行にまたがる場合で困ります。
**これは
複数行にまたがる
太字**です
この場合カーソルがいる行だけ見ていては、太字かどうか判定できません。また、
`コードスパンなので**太字ではない**`
のように、使われる記号としては太字ではあるが、太字として解釈しない場合もあります。これらをまともに対応していくと、最終的に文章全体を解析して構文木を生成するMarkdownパーザを実装することになります。
実装方針
自分でMarkdownパーザを作るのも良いですが、すでにApple公式が作ったものがあるのでそちらを利用しましょう。
swift-markdownは cmark-gfm を利用して実装されています。
カーソル位置を取得できるようにする
swift-markdownを使う前に、カーソル位置を取得できるようにしましょう。
import UIKit

final class ViewController: UIViewController {
    @IBOutlet weak var textView: UITextView! {
        didSet {
            textView.delegate = self
        }
    }
    @IBOutlet weak var label: UILabel!
}

extension ViewController: UITextViewDelegate {
    func textViewDidChangeSelection(_ textView: UITextView) {
        print(textView.selectedTextRange)
    }
}
こうすれば、カーソル位置がUITextRangeとして取得できます。
UITextRangeをSourceLocationに変換する
このカーソル位置をswift-markdownで利用している値に変換する必要があります。swift-markdownでは文章のどこに対象が存在しているかを示すために、SourceRangeが使われます。SourceRangeは
/// A range in a source file.
public typealias SourceRange = Range<SourceLocation>
と定義されているので、SourceLocationのRangeになります。そんなSourceLocationは
/// A location in a source file.
public struct SourceLocation: Hashable, CustomStringConvertible, Comparable {
    public static func < (lhs: SourceLocation, rhs: SourceLocation) -> Bool {
        if lhs.line < rhs.line {
            return true
        } else if lhs.line == rhs.line {
            return lhs.column < rhs.column
        } else {
            return false
        }
    }

    /// The line number of the location.
    public var line: Int

    /// The number of bytes in UTF-8 encoding from the start of the line to the character at this source location.
    public var column: Int

    /// The source file for which this location applies, if it came from an accessible location.
    public var source: URL?

    /// Create a source location with line, column, and optional source to which the location applies.
    ///
    /// - parameter line: The line number of the location, starting with 1.
    /// - parameter column: The column of the location, starting with 1.
    /// - parameter source: The URL in which the location resides, or `nil` if there is not a specific
    ///   file or resource that needs to be identified.
    public init(line: Int, column: Int, source: URL?) {
        self.line = line
        self.column = column
        self.source = source
    }

    public var description: String {
        let path = source.map {
            $0.path.isEmpty
                ? ""
                : "\($0.path):"
        } ?? ""
        return "\(path)\(line):\(column)"
    }
}
と定義されています。つまり、
line: 全体の何行目かcolumn: 行頭から何文字目か
という要素で対象の場所を示しています。ここでの注意点としては
事です。もうすでに面倒くさい匂いが漂っています。
さて、UITextViewの扱いに慣れた人は感づいていると思いますが、こんなカウント方法をとるRange要素はデフォルトには用意されていません。UITextViewでは UITextVIew.selectedRange と UITextView.selectedTextRange でそれぞれ NSRange と UITextRange が得られるのですが、それぞれざっくり説明すると
- NSRange
locationとlengthが得られるlocation: 文章の先頭からn文字目length: locationからm文字分(範囲選択してないなら0)
- UITextRange
startとendが得られるstart: 文章の先頭からn文字目end: 文章の先頭からm文字目(範囲選択していないならstartと同様
といったデータが得られます。何行かをそのまま返してくれるAPIは無いので、変換処理を愚直に実装していきます。
func convertToSourceLocation(from selectedTextRange: UITextRange?, in textView: UITextView) -> SourceLocation? {
    guard let selectedTextRange else {
        return nil
    }

    let location = textView.offset(from: textView.beginningOfDocument, to: selectedTextRange.start)

    var lead: Int = 0
    var trail: Int = 0
    var currentLine: Int = 0
    var column: Int = location
    for line in textView.text.components(separatedBy: .newlines) {
        trail = lead + line.count

        if lead <= location && location <= trail {
            // SourceLocationのcolumnはUTF-8でカウントするので変換する
            let utf8BasedColumnCount = line.prefix(column).utf8.count

            // SourceLocationは1からカウントが始まる世界なので合わせる
            return SourceLocation(line: currentLine + 1, column: utf8BasedColumnCount + 1, source: nil)
        }

        currentLine += 1
        column -= line.count + "\n".count  // 改行コード分を追加で減らす
        lead = trail + 1
    }

    return nil
}
これでUITextRangeをSourceLocationに変換できました。
MarkupWalkerでカーソル位置が太字か確かめる
ようやく swift-markdownを使う段階に来ました。swift-markdownではVisitor patternを推奨しています。詳しい説明は省くのですが、公式ドキュメントのVisitors, Walkers, and Rewriters を読むとなんとなく雰囲気がつかめると思います。
さっそく、MarkupWalker のprotocolを利用して実装をします。
struct StrongWalker: MarkupWalker {
    var isStrong = false
    var cursorSourceLocation: SourceLocation

    mutating func visitStrong(_ strong: Strong) -> () {
        if let range = strong.range, range.contains(cursorSourceLocation) {
            isStrong = true
            return
        }

        descendInto(strong)
    }
}
このStrongWalkerとSourceLocationの変換処理を利用すると、下記の実装ができます。
extension ViewController: UITextViewDelegate {
    func textViewDidChangeSelection(_ textView: UITextView) {
        guard let cursorSourceLocation = convertToSourceLocation(from: textView.selectedTextRange, in: textView) else {
            return
        }

        let document = Document(parsing: textView.text)
        var strongWalker = StrongWalker(cursorSourceLocation: cursorSourceLocation)
        strongWalker.visit(document)

        print(strongWalker.isStrong) // => カーソルが太字記法内部にいるとtrue
    }
}
簡単なUIを作って様子を見る
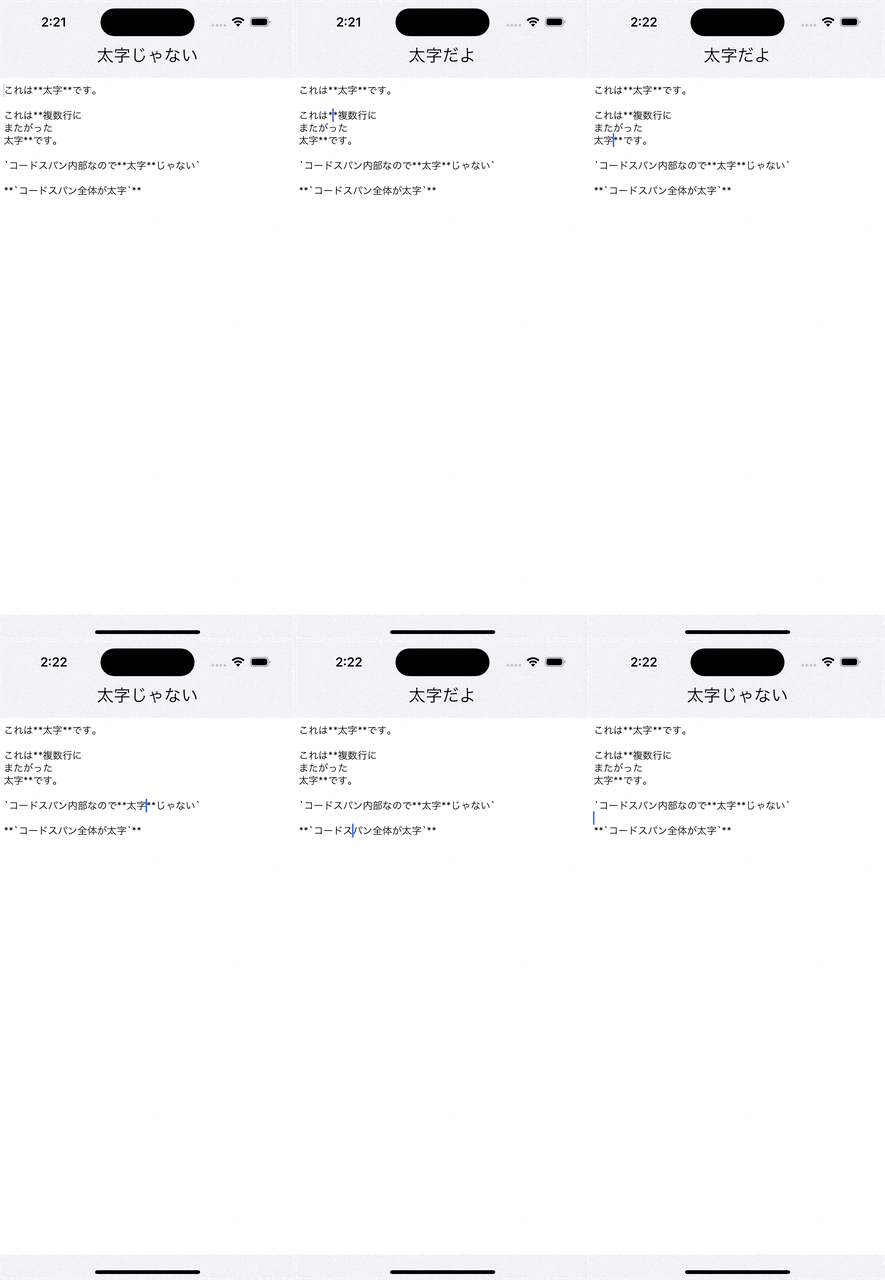
ようやくロジック部分が完成したので、簡単なUIを作ってちゃんと動いているか見てみましょう。UILabelをおいて
if strongWalker.isStrong {
    label.text = "太字だよ"
} else {
    label.text = "太字じゃない"
}
という簡単なコードを追加します。

無事に動いていそうでめでたいですね。
注意点
swift-markdownはMarkdownとして壊れた文字列でも問題なく解析してくれます。しかし、その場合はSourceRange, SourceLocationが正常に見えるが間違っている値で返ってきます。
まとめ
swift-markdownを使うことで、Markdownを解析することができます。しかし、swift-markdown内で使われるSourceLocationとSourceRangeは、UITextViewの世界とは異なる為に変換処理が必要かつ、1始まりのUTF-8カウントという特殊な世界です。
また、もしあなたがガッツリとMarkdownエディタを実装し始めたい場合は、 SourceRange <-> NSRange <-> UITextRange の変換迷宮に迷い込むでしょう。頑張って下さい。