SwiftUIでのキーボードショートカット
SwiftUIではButtonやToggleに対して .keyboardShortcut(_:modifiers:) でキーボードショートカットを実装することができる。
Toggle("Toggle", isOn: $flag)
    .keyboardShortcut("1", modifiers: [.control])

Button("Button") {
    print("Control+2")
}
.keyboardShortcut("2", modifiers: [.control])
タブ単体では動かない
エディタアプリを作っているとTabキーで \t を入力させずに、インデント処理を行わせたい場合がある。そのため、上述したノリで、
Button("Button") {
    print("Tab")
}
.keyboardShortcut(.tab, modifiers: [])
と実装してみるが動かない。ちなみに、modifiers に色々と入れられるが、試してみて動いたのは Option + Tab の組み合わせのみだった。
解決方法
色々試したが、UITextView を UIViewRepresentable で利用する方法になった。エディタアプリを作る時にはSwiftUIの TextEditor では機能不足で、 UITextView を利用することが多いのでちょうどよいといえばちょうどよい。
まず、 keyCommands を登録したCustom UITextViewを用意する。
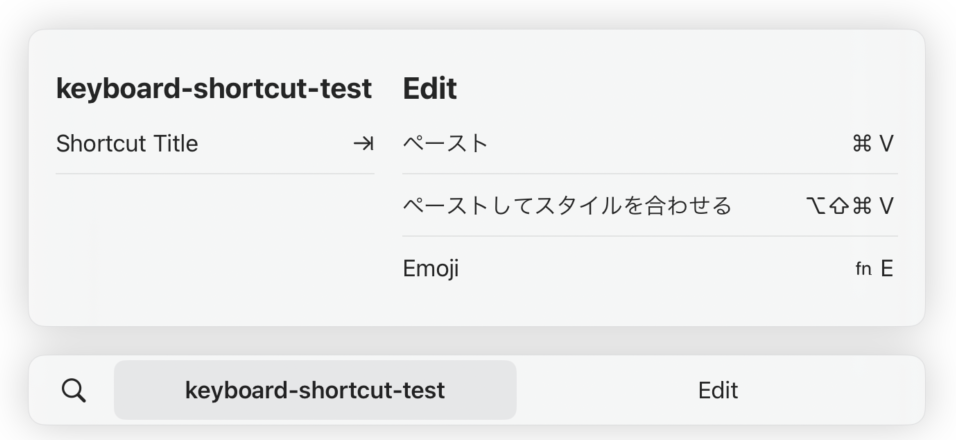
protocol MyTextViewDelegate: AnyObject {
    func myTextViewDidInputTab()
}

final class MyTextView: UITextView {
    override var keyCommands: [UIKeyCommand]? {
        let command = UIKeyCommand(title: "Shortcut Title", action: #selector(keyCommandTab(_:)), input: "\t", modifierFlags: [])

        // iOS 15以降ではこれを設定しないとEditor側への入力が優先される
        // ref: https://developer.apple.com/documentation/uikit/uikeycommand/3780513-wantspriorityoversystembehavior
        command.wantsPriorityOverSystemBehavior = true

        return [
            command
        ]
    }

    weak var myDelegate: MyTextViewDelegate?

    @objc func keyCommandTab(_ sender: UIKeyCommand) {
        myDelegate?.myTextViewDidInputTab()
    }
}
次にこれをSwiftUIで利用できるようにする。
struct TextView: UIViewRepresentable {
    private let onInputCommandTab = PassthroughSubject<Void, Never>()

    func makeCoordinator() -> Coordinator {
        return Coordinator(self)
    }

    func makeUIView(context: Context) -> MyTextView {
        let view = MyTextView()
        view.myDelegate = context.coordinator

        return view
    }

    func updateUIView(_ uiView: MyTextView, context: Context) {
        context.coordinator.parent = self
    }

    func onEvent(_ onInputCommandTab: (() -> Void)? = nil) -> some View {
        return onReceive(self.onInputCommandTab) {
            onInputCommandTab?()
        }
    }
}

extension TextView {
    final class Coordinator: NSObject, MyTextViewDelegate {
        fileprivate var parent: TextView

        init(_ parent: TextView) {
            self.parent = parent
        }

        func myTextViewDidInputTab() {
            parent.onInputCommandTab.send()
        }
    }
}
これで使う準備は整った。実際に使う時にはこうする。
import SwiftUI

struct ContentView: View {
    var body: some View {
        VStack() {
            TextView()
                .onEvent {
                    print("Input Tab.")
                }
        }
        .padding()
    }
}
これでTabを入力した時にはUITextViewに \t は入力されずに、イベントが発火して "Input Tab." がログ表示される。また、iPadで表示できるショートカット一覧にも、しっかりと登録されている。
これで無事にTabキーをハンドリングできるようになった。めでたし。